Master plan sites require more than a single building layout. Larger sites often include multiple buildings, circulation paths, parking areas, open space, amenities, zoning constraints, and different use areas that need to work together as one complete development concept.
In this tutorial, we will walk through how to create a master plan site in Zenerate using a 12-acre site as the demonstration example. The workflow begins with project setup and zoning feasibility analysis, then moves into layout zones, AI-generated test fit options, manual editing, parking use changes, additional site elements, and financial pro forma inputs.
This workflow is useful for developers, architects, and planners working on larger land development feasibility studies, residential communities, mixed-use concepts, or early real estate feasibility study projects. By combining AI site planning software with manual editing, you can create a more complete master plan site while still keeping the process flexible.
Step 1: Create a New Project and Set Up Zoning
The first step is to create a new project in Zenerate.
After locating the site and confirming the project area, review the parcel boundary, site context, surrounding roads, and access conditions.
At this stage, you can also set up zoning information using Zenerate’s new zoning integration feature. This helps bring zoning-related inputs into the early planning workflow so the site can be evaluated with a clearer understanding of development constraints. Zoning can affect density, setbacks, parking, buildable area, FAR, site coverage, and overall development potential.

Setting up the project correctly is important because zoning, parcel shape, street access, and site boundaries all influence what can be generated later. Before creating buildings or assigning site areas, make sure the basic site information is accurate.
A strong site feasibility analysis begins with a clear project setup. By using a real estate feasibility platform that connects zoning, site planning, and design generation, you can evaluate the site more efficiently before moving deeper into the planning process.
Step 2: Layout Zones for the Site
After creating the project, the next step is to layout zones across the site.

Zones help define where Zenerate can and cannot build. For a larger master plan site, this step is especially important because not every part of the site should be treated the same way. Some areas may be intended for buildings, while others may need to remain available for circulation, parking, open space, amenities, setbacks, landscape areas, or other site functions.
For a 12-acre site, zones may be used to organize:
• Building areas
• Open space
• Amenity areas
• Internal circulation
• Landscape areas
• Areas that should remain unbuilt
This step helps you move from a large parcel to a more structured master plan site. It also supports a more accurate buildable area analysis, because you can separate areas intended for development from areas that should remain open or serve another purpose.
For developers conducting early land feasibility analysis, this makes it easier to understand how much of the site can realistically support buildings, parking, amenities, and circulation.
Step 3: Use AI Generate to Create Initial Test Fits
Once the site zones are set up, you can use AI Generate to create different test fit options for the site.

At this stage, the AI-generated results are used as a foundation rather than the final design. The goal is to quickly create starting options that show how buildings, density, parking, and circulation may work across the site.
For a master plan site, AI Generate can help you quickly explore different development directions, such as:
• Multiple residential buildings
• Different density strategies
• Building placement options
• Parking and circulation relationships
• Site planning alternatives
• Different use arrangements across the parcel
This step is helpful during a development feasibility study because it gives you multiple options to review before spending time manually building the full site plan from scratch.
Using test fit software for real estate development can make this early process more efficient. Instead of creating one manual layout and revising it repeatedly, you can use automated site plan generation to explore several options, compare results, and identify the strongest foundation for the master plan.
This is especially useful when trying to answer early feasibility questions such as how many units can fit on a site, how parking may be distributed, and how different building placements affect overall site yield.
Step 4: Tweak Building Structure and Floor Plan Changes
After selecting an AI-generated option, you can begin making manual edits.
This is where the master plan becomes more specific to the project. The AI-generated layout provides the foundation, while manual editing allows you to refine building structure, floor plan organization, and use assignments.
For example, a 3-bedroom unit can be changed into an amenity space if the master plan requires additional shared facilities or community-focused programming.

This type of edit is useful because master plan sites often need more than standard residential units. Depending on the project, you may need to include amenity areas, leasing spaces, shared facilities, community rooms, or other non-residential support spaces within the plan.
Manual editing helps you adapt the AI-generated test fit to better match the intended development concept. It also supports more flexible site planning software for real estate development workflows, where the first generated option can be adjusted based on design intent, client needs, market strategy, or site-specific constraints.
Step 5: Change Use Cases for Parking Types
After adjusting the building and floor plan, you can update parking use cases.
For this demonstration, we added a section of EV parking and ADA parking. This helps show how the site can support different parking needs within the master plan.

Parking is an important part of site feasibility analysis, especially on larger sites where parking distribution can affect circulation, access, building placement, and overall site organization. A master plan should not only show how many parking spaces are included, but also how those spaces are assigned and distributed.
For example, you may want to define:
• Standard parking
• EV parking
• ADA parking
• Guest parking
• Residential parking
• Amenity-related parking
By assigning parking types more clearly, you can create a site plan that better reflects real project requirements and presentation needs.
This step is also important for parking layout software and automated parking layout workflows because parking is not only a count. It affects access, circulation, ADA compliance, resident convenience, and the overall functionality of the master plan.
Step 6: Add Extra Buildings, Areas, and Site Elements
Once the main buildings and parking areas are adjusted, you can add extra buildings, areas, or site elements as needed.
For example:
• A daycare
• An outdoor pool
• A garden area
• A playground

These elements help turn the site from a basic building layout into a more complete master plan. On larger development sites, amenities and support spaces are often an important part of the overall planning strategy. They can influence circulation, open space distribution, resident experience, and how the project is presented.
Adding these elements also helps communicate the design intent more clearly. Instead of showing only buildings and parking, the master plan can begin to show how the site functions as a full community.
During early land development planning, this step helps you evaluate how different site elements work together and whether the overall plan feels balanced. For residential or mixed-use feasibility software workflows, these added areas can help show how the site supports not only density, but also community programming and long-term usability.
Step 7: Input Financial Pro Forma Information
After the master plan has been developed, you can take the workflow one step further by inputting financial pro forma information.
Depending on the project type, you may input assumptions for a build-to-rent project or a for-sale development. This helps connect the physical site plan to the financial side of the real estate feasibility study.
For example, you may want to review assumptions related to:
• Unit type
• Sales price or rent assumptions
• Parking assumptions
• Development costs
• Revenue potential
• Project performance

This step helps you move beyond layout planning and begin evaluating whether the proposed master plan is financially realistic.
For developers and real estate teams, this connection between test fit planning and financial feasibility is especially useful. A plan may look strong visually, but the pro forma helps show whether the development strategy can support the project goals.
By connecting site planning with financial inputs, Zenerate can support a more complete real estate scenario planning software workflow. This helps users compare not only what can fit on the site, but also which scenario may be more financially practical for a build-to-rent or for-sale strategy.
Using Test Fits to Build a Stronger Master Plan
Creating a master plan in Zenerate is not about generating one option and stopping there.
The strongest workflow is iterative. You can create an AI-generated starting point, manually adjust the layout, revise use cases, add site elements, and continue comparing options until the master plan better reflects the project goals.
This is especially important for larger sites because small changes can affect the full development concept. A shift in building placement may change circulation. A new amenity area may affect open space. Parking assignments may change how residents and visitors move through the site.
By using test fit modeling throughout the process, you can better understand how the site responds to different planning decisions.
This is where generative design software for real estate becomes especially useful. A master plan is not only about creating a site plan. It is about comparing development scenarios, reviewing trade-offs, and understanding how zoning, density, circulation, parking, amenities, and financial assumptions work together.
For users conducting site yield analysis, this type of workflow can help answer important early questions:
• How much development can the site realistically support?
• Which areas should remain open or reserved for amenities?
• How does parking affect density?
• How do building locations affect circulation?
• Which scenario best supports the project’s goals?
Adding AI Rendering to the Master Plan
After the master plan has been created, you can take the presentation one step further by generating an AI rendering of the site.

An AI rendering can help turn the master plan from a technical site layout into a more visual concept. This is useful when presenting the site to clients, internal teams, developers, or other stakeholders who may want to understand the overall look and feel of the development.
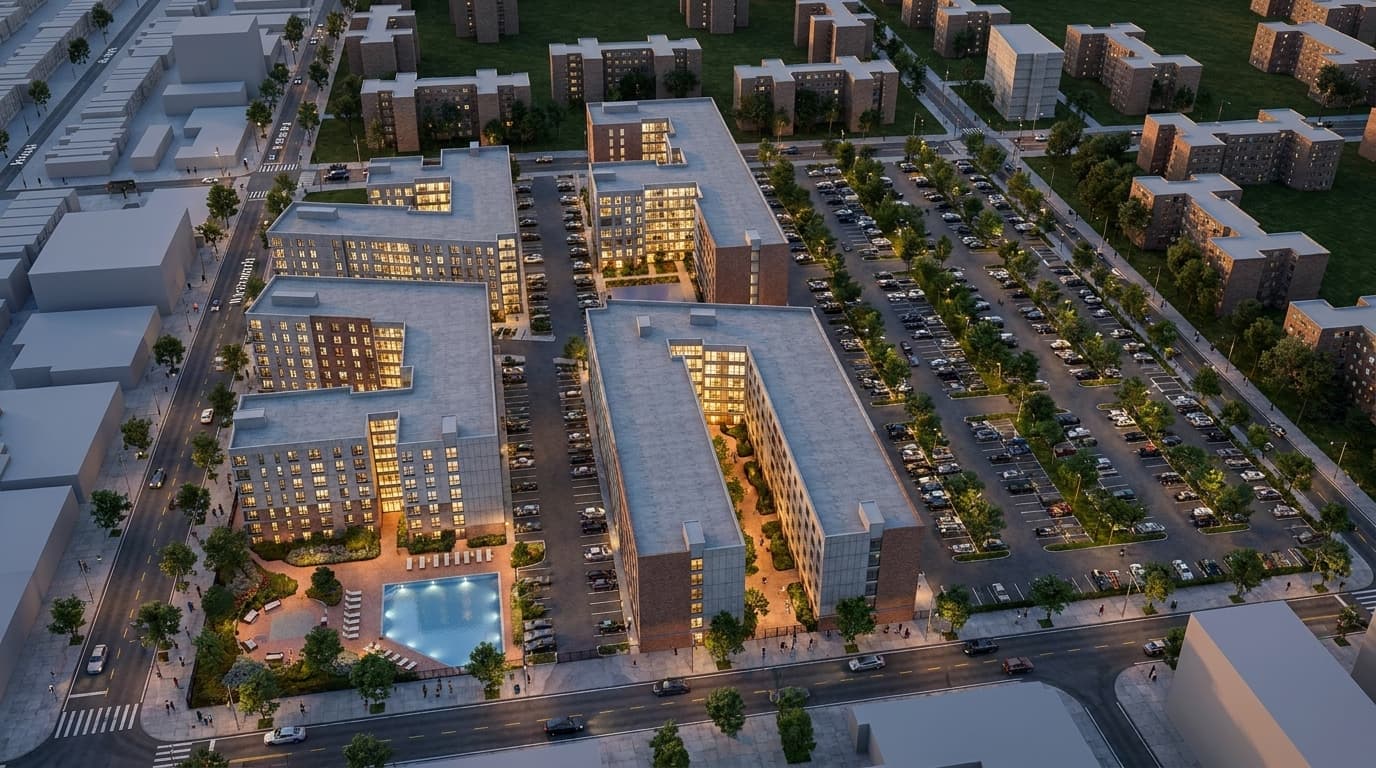
For a 12-acre master plan site, an AI rendering can help communicate:
• Building placement
• Open space
• Amenity areas
• Pedestrian zones
• Landscape areas
• Overall site character
• The relationship between buildings and outdoor spaces
This can make the master plan easier to understand during early discussions. While the test fit helps evaluate feasibility, the AI rendering helps communicate the design vision.
Together, they create a stronger early-stage planning workflow by combining AI real estate feasibility software, site planning, scenario comparison, and visual communication.
Why Master Plan Feasibility Matters
A master plan site requires more than a single layout.
Larger parcels involve multiple planning decisions that need to work together. Building placement, zoning, parking, open space, circulation, amenities, and financial assumptions all influence whether the project is realistic and effective.
Using Zenerate for master plan feasibility allows you to explore these relationships earlier in the process. Instead of waiting until later design phases to understand how the site performs, you can test multiple planning strategies during early site feasibility analysis.
This helps developers, architects, and planners make better decisions before moving forward with acquisition, design, entitlement, or investment discussions.
For larger parcels, the goal is not only to create a clean site plan. The goal is to understand the site’s development potential, compare possible scenarios, and identify a concept that is physically realistic, financially informed, and easier to communicate.
Final Thoughts
Creating a master plan site in Zenerate helps you evaluate larger parcels with more structure and flexibility.
For teams working through a development feasibility study, this process can make larger sites easier to understand. By combining AI generation, manual editing, site yield analysis, test fit comparison, and visual rendering, you can create a clearer picture of what a master plan site can realistically support.
Explore What Zenerate Can Do
If you would like to discuss how Zenerate could support your feasibility or land development workflow, book a demo below to start the conversation.
Book a Demo + Start a Free Trial